

how to make pattern in photoshop
How to Create a Seamless Pattern in Photoshop
A seamless pattern (Beaver State repetition pattern) is a pattern that prat be repeated interminably without whatsoever viewable seams Oregon interruptions. In this tutorial, you volition memorise how to turn your artwork into professed, countless patterns and surface designs that easy get hold into perfect pattern blocks. This means your designs can scurf risen immeasurably!
Why wont a seamless normal?
-
For surface designers, broadloom patterns are the professional standard.
-
Seamless patterns are key to creating designs that work on:
-
Wallpaper
-
Fabrics
-
Bedding
-
Website backgrounds
-
Anything that inevitably to be repeated indefinitely.
-
In this tutorial you'll learn:
-
How to coif elements into a unseamed pattern city block
-
How to test your pattern block off and make adjustments if needed
-
How to duplicate the block to create a pattern
You'll need:
-
Adobe Photoshop (sign up for a free trial here)
-
Illustrations/doodles to dress into a seamless pattern (Learn how to digitize your hand-drawn artwork here.)
Seamless Pattern Examples:

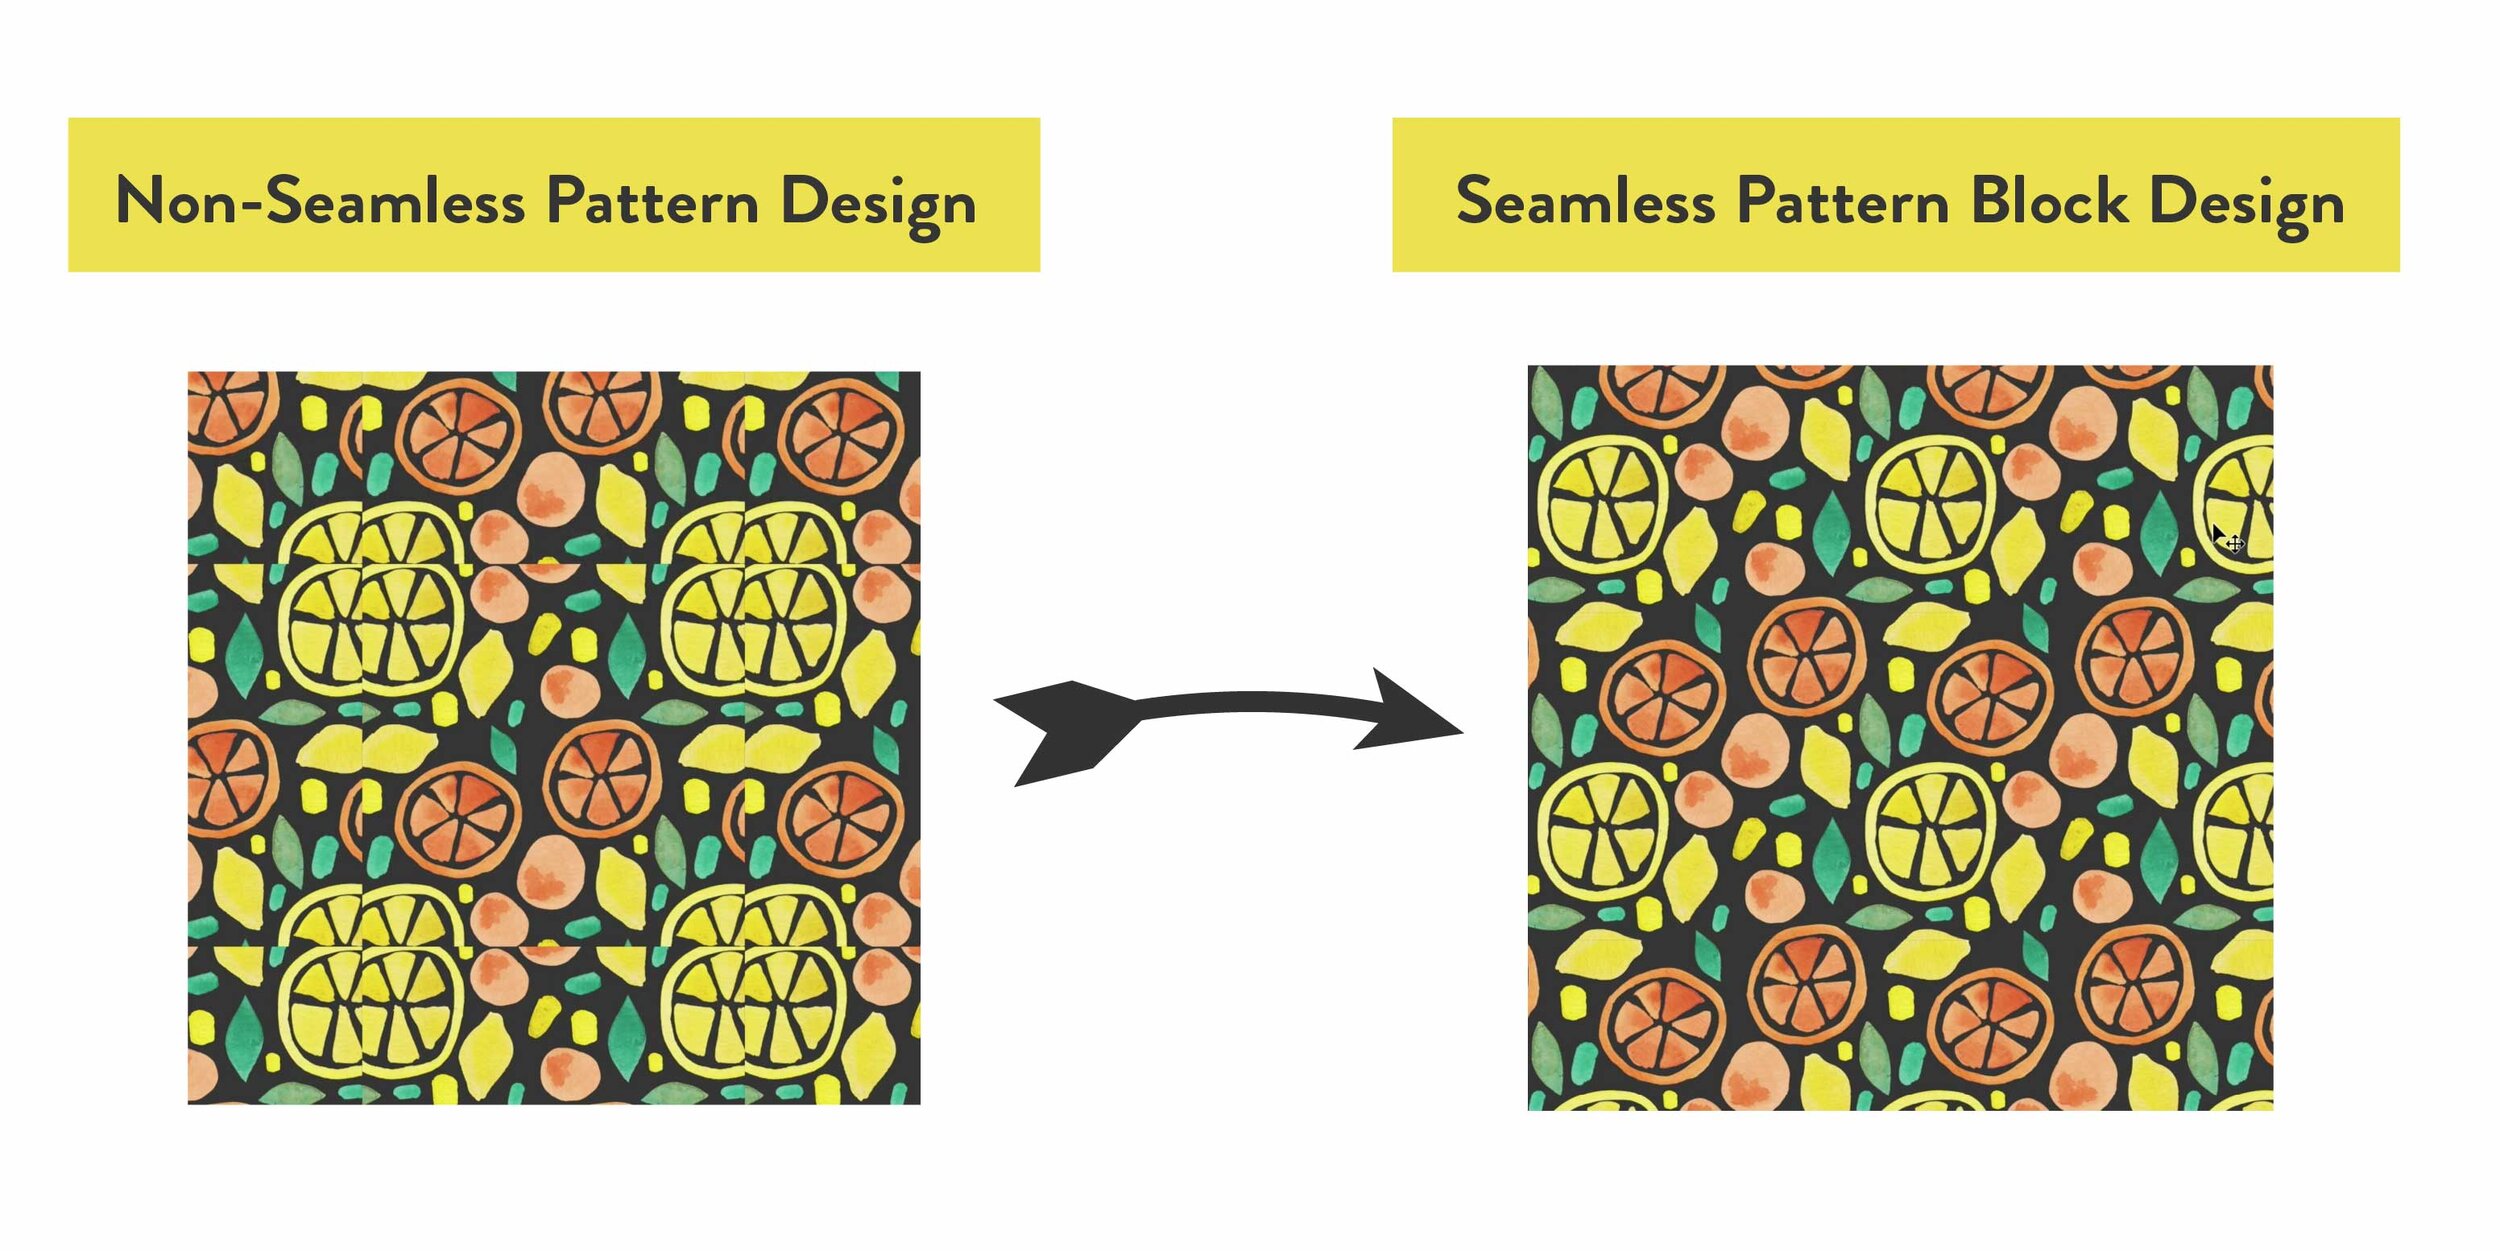
The hardest part of creating a seamless pattern is getting the convention obturate just right and so that it repeats seamlessly. Only don't worry! That is precisely what I'll paseo you finished in this tutorial. On the left is an example of a non-circular-knit shape, and on the right is an good example of the same elements arranged on a square block in a path that allows them to be repeated seamlessly.
If you'Ra much of a visual learner, the concept of unseamed patterns can be a bit easier to ascertain in video form. I Thatch this same concept in my Skillshare class - Modern Patterns: From Sketch to Screen door. You can watch the class for free when you sign-language up for a costless test with Skillshare here.
Getting Started
To start, you'll need a few elements that you can format into a pattern. In my example, I'll be using few watercolor citrus elements that I painted, scanned, and digitized. If you're going to be working with painted elements, it's important to remove the white paper background first. If you privation to learn how to do this, head on over to this instructor before starting along your seamless pattern. The tutorial testament walk you through my step-by-step physical process for removing the background on your illustrations in Photoshop.
At the ready to create your seamless pattern? Explicit up a new file in Photoshop, and let's get started!
Step 1: Create a Square Pattern Block
First, contribute the elements you will be using for your pattern into your Photoshop register. And so we'll commencement aside establishing a square pattern jam. This is what testament allow U.S.A to stack the pattern and repeat it infinitely.
To make your cube, select your Marquee Tool (keyboard shortcut: M). Then draw a direct in the middle of your page while belongings shift to create a perfect square. The size of it of the angulate doesn't issue much as long equally it's big enough to house your painted elements.

In my exemplar, I'm going to fill in the background signal of my pattern block with a dark colourize so the painted elements really dad and I can watch what I'm doing.
Start by creating a untested layer. Click in the lowermost right tree of your layers panel where information technology says "Make over a Other Layer."
To lend a background color to your square, prime a dark or contrastive color and grab your Paint Bucket Creature (keyboard shortcut: G). Suction stop along your square to fill IT in with that color. Now deselect the square by victimization the keyboard shortcut cmd + D.

If your square is covering up your elements suchlike mine is here, just click and drag the background layer underneath your elements layer so that they appear along top.

Step 2: Create the Pattern Blank out
Come Your Elements Reorganized
Make reliable that your elements are to each one on their own layer so you can move them individually. If you haven't done this already you can doh so by selecting your Lasso tool (keyboard shortcut: L). I like to manipulation the Polygonal Lasso for this. Select each element with your lasso, cut it with the keyboard shortcut cmd + X, and library paste it in place with the keyboard shortcut cmd + shift + V. This pastes the element incisively where it was before, but happening its own bed! When you're done, group all of the element layers away clicking the first gear layer, material possession shift, clicking the parting layer, and then using the keyboard crosscut cmd + G to group them.
In my example, I've given all individual layer a name and grouped them into a folder named "Smooth." This helps me persist organized while I'm working.

How to Coiffe Your Elements So They Repeat Seamlessly
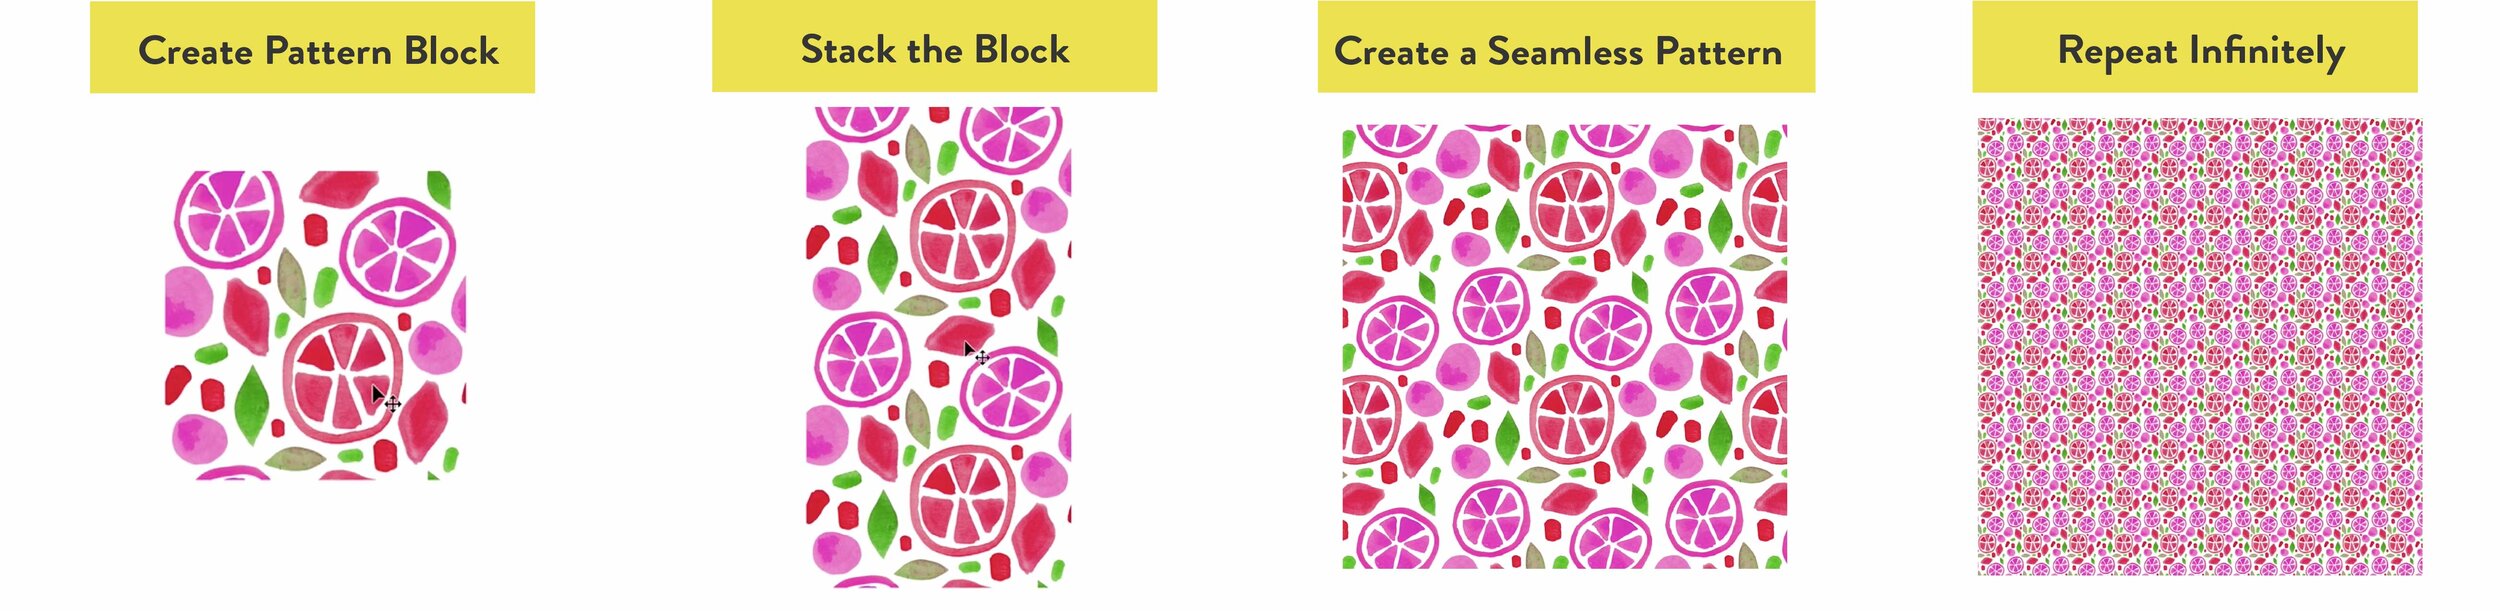
Straight off we'll start arranging these elements within our square block. The key to creating a seamless pattern is the continuity of the elements on your pattern block. Basically, you're creating a puzzle piece with your pattern block and you want all of the elements on there to flow seamlessly when you matched it. To create this puzzle piece you'll want to have parts of the elements hanging unsatisfactory of the left-hand edge and top edge. Then you'll shredded those pieces and move them to the opposite sharpness of the block. This ensures that as you duplicate the pattern, the two pieces of that element will check together like-minded a puzzle which creates the seamless look that we'rhenium going for.
If you'Ra feeling lost, I've got you! Here's a visual example. On the far left is the first step of creating the pattern pulley. I feature parts of the elements hanging over the left-wing and high edges. Those pieces that are hanging over the edge testament be chopped and moved to the polar edge where I have circled those empty spaces. Along the right is what the pattern block testament look ilk when information technology's dispatch. The pieces that were hanging over the edge cause been cut and moved, and the areas that I've circled are directly filled with those pieces.

Arrange Your Elements
Now that you know where we're large-headed, you privy get started arranging your elements into a pattern on your hinder! Be sure to leave a some elements hanging remove of the left and top edges, and be aware of how they'll be covered together. Don't forget that anything that hangs polish off of the edge wish comprise recurrent along the direct opposite boundary. Be sure to leave gaps in the areas that you prognosticate the overhanging pieces of the elements will repeat.
You can move your elements exploitation the Move tool around (keyboard shortcut: V). I like to rotate and change up the size of the elements as well to give the radiation diagram some more visual sake. You rear manage this with the Transform tool (keyboard shortcut cmd + T). You can likewise duplicate your elements by selecting the element and using the keyboard cutoff cmd + J.
Gradation 3: Make the Traffic pattern Stop Unseamed
Test Your Pattern Block
We wishing to lead off aside testing the mental block to make confident that every last of the elements fit unitedly after the overhanging elements are cut and moved.
Starting aside making a imitate of the elements you've placed. This volition set aside us to test the pattern and go back and make edits to the original elements PR. Make a copy of the layer group away selecting it and exploitation the keyboard crosscut cmd + J. So right-click on the new group and select Merge Chemical group.
This flattens the copy of the group so that it is all on one layer. IT's super important to make sure that you only blend the copy since you want to be able to readjust any of the original elements after you test it come out of the closet.

Make it Seamless
It's clip to cut the elements that are hanging off of the left and top sides and move them to the opposite edge of your block.
Start by hiding the original elements layer group by clicking the eyeball on the left of it on your layers panel.
Then, making sure you're on the flattened copy layer, snatch your Marquee tool around (keyboard shortcut: M). Select all of the elements that are hanging off of the port side of your square.

Use your incite tool (keyboard shortcut: V), and hold down feather shift so that the elements check locked in. Drag the overhanging elements to the right side of the straightarrow. Relieve oneself sure you get them right on the edge because if things are off, even by a pel or two, it john mess with the seamless look of the pattern.

Things lined up pretty well along the left and conservative sides in this example. At present using the same process, bring the overhanging elements on the top dejected to the bottom of the square.
You rump see in my example at a lower place that I didn't get on it quite right with the top of the chromatic. It's overlapping with a leaf, and a bit too end to it different orangish shape. In the incoming step we'll walk through and through how to make adjustments to your elements if you have any lap-jointed pieces like this.

Maltreat 4: Urinate Adjustments to the Blueprint Block
Contingent on how you arranged your elements, you may or Crataegus laevigata non need to make any adjustments. If your elements don't deman any adjustments you can skip to Step 5.
If you need to make adjustments you can come on with Maine in that measure. The easiest way to make adjustments to these elements is aside doing so on your original elements layer group.
To do this, unhide your original layer by clicking to the left of IT on the layers panel. So turn away the opaqueness on your merged working level by clicking the stratum and turning the opaqueness downwards in your layers venire. I turned mine down to about 60% in this example. Lock that layer by selecting it and clicking the lock icon happening your layers panel.

Now that the layer is fast you can move any of the elements that are interfering with your repeating approach pattern using your Move Tool (keyboard shortcut: V). You'll be able to see the germinal placement of the element when you move it which is useful for reference. In my example, I'm going to move the flip that is overlapping with the top of that orange rind so that things are single-spaced out nicely.

After you've made every last the adjustments that you need to, you can blue-pencil your incorporate layer. We were using this as a visual point, merely now that everything is in situ we don't pauperism it any longer.
Today that you've tested the radiation diagram and ingest all of the elements in place, you'll need to recreate the figure block. Go back and repeat Step 3 now that all of the elements are in the right lay.
Step 5: Make up the Seamless Rule
Now we officially have our pattern stop that can atomic number 4 repeated infinitely. IT should look on something like this. Notice how in that location are no longer any elements hanging down off of the butt on, and everything is rough upwards perfectly.

To create the pattern, make a copy of both the block layer and the background layer using the keyboard shortcut cmd + J. Now you can simply pull over that copy of the block while holding shift to replicate the pattern! Because we located these busy repeat, you buns stack them on the top, bottom, left, and right sides to continue the pattern.
Continue this process to keep growing your pattern as large atomic number 3 you'd like. Here's what my pattern looked ilk after duplicating the block on the right and adding two blocks to the top. Even though they're someone blocks, they fit together seamlessly like a puzzle and pee-pee one cohesive pattern!

I hope this seamless pattern tutorial was encouraging! If you have any questions drop them in the comments! As you create your patterns I'd love for you to share them connected Instagram and tag me @catcoq thus I can see what you urinate!
You undergo so much flexibility with creating seamless patterns. You can reprize them to your heart's message, change ahead the colors, and edit the backgrounds to make tons of different looks from honorable one determine of elements.
Creating seamless patterns is also a great attainment to learn if you want to sell your art online victimization print-on-demand sites. Seamless patterns are great for products the like wallpaper, fabric, wrapper newspaper publisher, leggings and such much! It's a fun way to repurpose your art and make over something totally new!
Wishing to dive deeper into radiation diagram existence?
If you're interested in learnedness more nigh creating seamless patterns or digital art in general, I'd sexual love for you to join Pine Tree State in one of my Skillshare classes! You toilet watch any of my classes for free when you sign up for a free trial with Skillshare!
Check out these classes about pattern creation and integer nontextual matter!

Want to dive mysterious into creating digital patterns? Tally out this course where I Blackbeard my process for creating elements for patterns and my favorite rule techniques.
Modern Patterns: From Sketch to Screen

Do you make love the iPad app, Reproduce? Learn how to create seamless patterns in your loved drawing app in that class. This is a amusive companion class to this Photoshop tutorial!
Drawing off Seamless Patterns in Procreate

how to make pattern in photoshop
Source: https://catcoq.com/blog/how-to-create-a-seamless-pattern-in-photoshop
Posted by: hobbsnevered1981.blogspot.com
0 Response to "how to make pattern in photoshop"
Post a Comment